Groundworks’ recent Personal Digital Archiving blog post on Scanning Photographs provided a sample workflow on how to scan physical photographs, and tips on which settings might be best for your specific situation. Now that you’ve started scanning your photographs, you may have noticed not all your photos have aged as well as George Clooney over the decades. This post will provide some basic guidance on how to do some light editing of your scanned photographs using Adobe Lightroom on Groundworks' computers during a 1-1 appointment or our open hours.
Groundworks would never recommend retouching an old photo to make it look like it was taken with a modern-day camera. We think the goal of this exercise should be to create a time capsule. We want the scanned image to look like it was originally created decades ago, but maybe make the digital image ‘pop’ a bit more and clean up some signs of wear and tear rather than turn the photo into something it is not.
In most cases, editing scanned images on the Windows 10 Photo app on PCs and Photos on Mac will be enough for many users looking to brighten an image, color correct, or fix minor blemishes. However, for those occasions where you run into those software’s limits, access to a professional level program like Adobe Lightroom in Groundworks can come in handy.
Before we get started on how to retouch old photos, we need to quickly define what Adobe Lightroom can and cannot do. Lightroom is not Adobe Photoshop, and some restorations are best left for Photoshop where you have more tools and features to repair photos. Here’s a brief comparison between the two with example images.
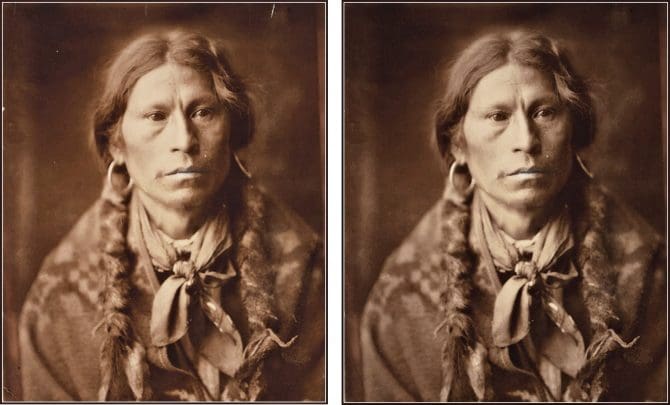
Why Adobe Lightroom for Retouching Old Photos?
The main advantage of Adobe Lightroom is that it is a an image management tool. You can organize and catalog all your photos, and easily add ratings, tags and metadata to quickly find the image(s) you are looking for. While Photoshop can do anything concerning digital editing, Lightroom focuses on speed and staying true to photography. Do you have a pile of faded photos from the same era? Once you set your changes for one photo, Lightroom can save those presets apply those edits to dozens, or even hundreds of photos, with a few clicks.
Lightroom will meet the needs of roughly 90% of photographers, and those restoring old photos, by allowing you to easily adjust/straighten and crop, enhance light and color, correct perspective, sharpen images, create, save and use filters (presets), and use the healing brush and clone tool to remove minor blemishes like dust and water spots.
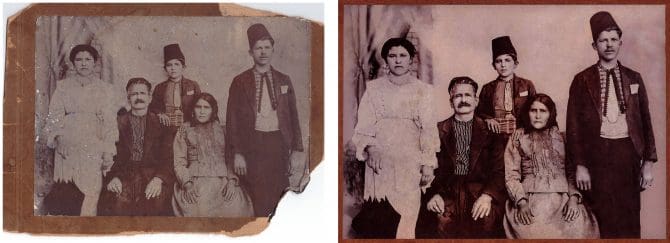
Why Use Adobe Photoshop for Retouching Old Photos?
While 90% of photographers will only use Lightroom to edit their photographs, most of the other 10% will start in Lightroom and finish editing in Photoshop. You can easily make the same edits in Photoshop as you can in Lightroom, but only one image at a time.
Even so, Photoshop has many advantages. Does a photo have extensive water damage? Large creases? Missing pieces? Distracting objects? Photoshops' filters, layers and masking tools can help you recreate what was lost, or lay a foundation to create a composite images from multiple photos and make an entirely new creation.
A Sample Lightroom Workflow
After you've imported your files, double click on a photo to open Lightroom’s workspace. This is where you can enhance and edit the image, and tweak settings to improve just about every aspect of your photo. Enhance the light and color, correct perspective, sharpen, and add creative effects to make your images shine.
Lightroom uses non-destructive editing, which means you can make changes to a photo without permanently altering the original file. What does this mean? While Lightroom saves your changes as you make edits, they do not become permanent until you export your retouched photo from Lightroom. This exported image is only a copy of the original, and you will still have the original file tucked into the cozy file folder where it lives.
For this exercise, we’ll use the following image of an early 1970s era biplane we found on anyjazz65’s Flickr profile.
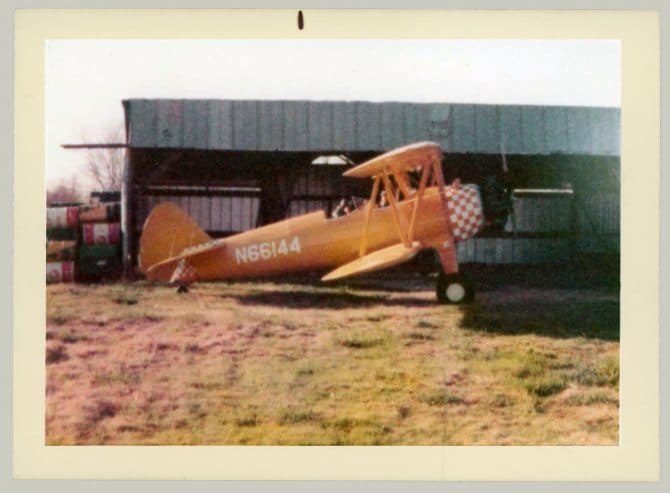
First things first, let’s crop the photo. You can see the image was attached to a larger piece of paper, and the scan also extended to the rest of the scanning surface beyond it. If we don’t crop these out, these colors may inadvertently effect some of the changes we want to make as we move through the steps below.
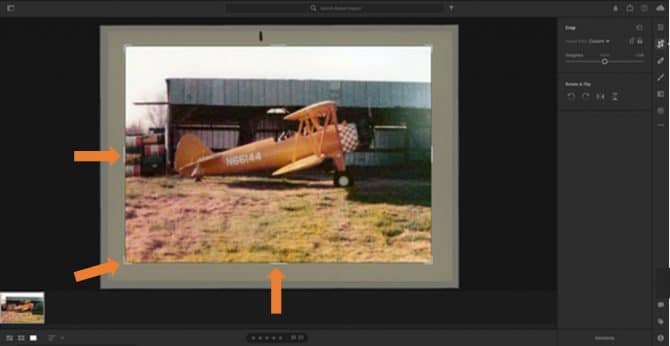
After we import the photo to Lightroom, double-click on it to open it in the workspace. Click on the Crop tool on the right-hand side edit toolbar. Use the gray sliders on each side and/or corner to adjust the image.
Next, we can click on the Edit Panel (above Crop) to tweak the white balance of the image to remove the faded yellow cast the picture has developed over the years. Auto only made the yellows brighter so I used the eye dropper in the Color Panel on a light, neutral brown and slightly adjusted the Temp and Tint sliders until I got something a little more natural.

Next, the image was a tad dark, so I slightly adjusted the exposure and contrast in the Light Panel. I didn’t go crazy with either adjustment, just enough to get some definition.

As long as I was in the Light Panel, I fiddled with the Highlights, Shadows, Whites and Blacks. If you are comfortable with it, you could also play with the Point Curve to do work with all four at the same time. Just remember, a little will go a long way.

I boosted the Vibrance in the Color Panel just a touch to exaggerate the old colorization and the 1970s feel of the photo.

Noise Reduction (Detail Panel) was next. You can really see the high degree of noise in the grass and the purple on the left side of the shed’s façade. This was most likely due to the paper, but also the resolution in which the photo was scanned.

Lightroom’s Noise Reduction did a great job removing a lot of the noise, but again, I didn’t go crazy. Removing all the noise from an image will look terrible and fake. We advise against it.
Now, we can remove damaged areas of the image. If we did this any earlier, the edits we make with the Healing Brush and Clone tool may not look as natural as we change the lighting, colors and details of the overall image. There weren’t any cracks or creases in this photo, but it was easy to zoom in and take out the water spots in the sky and the white dust spots on the dark beams in the shed. Don’t forget the Crop tool can be your friend. If there are damaged edges on an image, sometimes the best or only way to take care of those is by cropping them out completely.

Finally, with everything else out of the way, I boosted up the sharpness and also used the Clarity slider a touch. Again, not trying to do anything that looks unnatural, just trying to bring back some of the sharpness that was lost over time and due to the noise reduction.

And, viola! A true-to-the-era restoration of a scanned physical photo in digital form!
If you find retouching old photos a challenge, or if you are looking for a free open-source alternative to Lightroom so you can edit your photos at home, schedule a 1-1 appointment with Groundworks and we can work through your specific needs.


